Contents:
1. Introduction
2. Robot Machine Configuration
3. iOS Device Configuration
4. Automation
1. Introduction
T-Plan Robot Enterprise version 3.3 introduced a new connection
type called "iOS Mirror".
This allows Robot to test Apple iOS devices using our iOS
7&8 Plugin, or iOS
6 Server WiFi connection, where the device screen is
displayed on the local desktop using the Apple's 'AirPlay
Mirroring' technology or transferred over the Lightning
USB cable (see below). This connection allows Robot to test
iOS applications on non-jailbroken (non-rooted) devices, where
before only a VNC Server connection was supported.
In environments where jailbroken devices are supported, the iOS
Mirror connection can be used to supplement the VNC
Server (Veency) operation, for increased performance
and suitability. E.g. Game testing relying on the OpenGL
technology.
Robot version 4.1 delivered two major
improvements:
- The device screen can be mirrored through the Lightning
USB cable. It is supported only for devices equipped with
the Lightning
connector and connected to Mac OS X. This solution
allows to avoid 3rd party mirroring applications. As the screen
gets mirrored directly to the Robot's desktop viewer it is also
independent from the local desktop restrictions such as the
required screen size or number of concurrently connected
devices.
- WiFi connection to the T-Plan iOS Plugin or Server can be on
Mac OS X optionally tunneled through the USB cable.
This allows to avoid unstable or slow WiFi networks. The device
must be still connected to a WiFi at least in the connection
init phase to ensure a correct start up of the network
interfaces.
It is recommended to use the T-Plan iOS
7&8 Plugin or iOS
6 Server, instead of VNC due to
a number of advantages:
|
iOS Mirror
connection with
T-Plan Plugin / Server
|
iOS Mirror
connection with
VNC Server (Veency)
|
VNC Server
connection with
VNC Server (Veency)
|
Supported since
|
Robot v3.5
|
Robot v3.3
|
Robot v2.0
|
Jailbroken device
required
|
NO
|
YES
|
YES
|
Support of apps with
OpenGL content
|
YES
|
NO
|
NO
|
Pinch/Zoom support
|
YES
|
NO
|
NO
|
UTF-8 character
support
|
YES
|
NO*
|
NO*
|
Display orientation
support
|
YES
|
LIMITED**
|
NO
|
Connections per
machine
|
1***
(Mirror apps)
NO LIMIT**** (Lightning USB)
|
1***
(Mirror apps)
NO LIMIT**** (Lightning USB) |
NO
LIMIT***
|
* The RFB (VNC) protocol is limited to ISO 8859-1 characters.
** Only the portrait & counterclockwise landscape modes are
supported.
*** One machine running Robot can automate only one iOS device
over the iOS Mirror connection at a time because it relies on an
exclusive access to the local desktop. The standard VNC Server
connection doesn't apply any limit to the number of connections
and one Robot machine may automate any number of iOS devices at a
time up to the limit given by the license key as long as there are
sufficient system resources (CPU, RAM)
**** Automation of multiple devices from a single Mac OS X machine
is possible over Lightning USB provided that there are sufficient
system resources (CPU, RAM). See the details
below.
Device Requirements:
- An Apple iOS device capable of screen mirroring. See
the online iOS
Compatibility Status page for the latest information.
Mirroring over the Lightning USB cable is possible only for
devices equipped with the Lightning
connector.
- The device must be connected to the network (usually over
WiFi).
- For the iOS
7&8 Plugin or iOS
6 Server driven testing, the device must have iOS
5.0 or higher. This option allows testing on Non-Jailbroken
(non-rooted) devices.
- For the VNC driven testing, the device must be
jailbroken and Veency
must be installed and running on it. See the online iOS
Compatibility Status page for the latest jailbreaking
status.
Robot Machine Requirements:
- Operating system:
- Any MS Windows supporting window translucency (in
general, Windows Vista and later).
- Mac OS X 10.7 (Mountain Lion) or higher (supported
since Robot v3.4.1).
- One of the screen mirroring technologies available (green indicates recommended
option(s)):
Operating
System
|
Screen
Mirroring Technology
|
Lightning USB Cable
|
AirServer
|
X-Mirage
|
Reflector
|
Mac OS X 10.7+
|
YES
|
NO
|
YES
|
YES
|
MS Windows Vista+
|
NO
|
YES
|
YES
|
LIMITED
|
- If the device is connected to Mac OS X through the Lightning
USB cable (since 4.1) there are no further requirements.
Use this setup where possible.
- Other systems must have AirServer,
Reflector
or X-Mirage (supported
since Robot 4.0.1) installed and activated ("the mirror
application"):
- MS Windows:
- AirServer is recommended for single device
deployments. Make sure to set off the "Full screen mode"
and set on the "Always on top" flag in its Preferences.
Airserver is not suitable for automation
of 2+ devices on a single PC desktop because it
displays all devices in a single window.
- X-Mirage can be used for
multiple device deployments because it displays one
window per device.
- Reflector v1 is OK but it lacks the iOS 9
support. Reflector v2 is currently not
recommended for Windows deployments (last tested Reflector
2.2.1, Oct 2015). It has a few annoying bugs which make
the connection unreliable. It often crashes after a mirror
disconnect and must be restarted. It fails to report the
correct mirror window size which leads to incorrect views
in the Robot's desktop. It sometimes changes the mirror
size unexpectedly after a few changes in the screen
orientation. Though Robot 4.1.1 delivered a few
workarounds such as automatic mirror restart or dynamic
inset detection (see iOS Mirror Preferences) the app is
usable only for test scenarios which use a stable iOS
device screen orientation (either portrait or landscape).
- Mac OS X:
- Reflector is the best option for Mac OS X. X-Mirage
is another good one.
- Though Robot will also recognize AirServer it is
not suitable for automation for practical reasons. It
starts by default in the full screen mode which is not
supported by Robot. It also uses pop up tool and title
bars which interfere in the screen.
- Java 1.7 or higher. The connection will be disabled
when Robot runs on Java 1.6. It is highly recommended to use Java from Oracle which is also the only
option for Mac OS X.
- When a mirror application is used it is recommended to
use a display with a resolution sufficient to fit the device
screen both in portrait and landscape modes (iPhone 4S screen
size: 640x960, iPad 2: 1024x768). Environments which do not
comply with this requirement may take advantage of the mirror
app scaling (right click Reflector -> Scale -> "Half Size" or "Actual Size").
Alternatively use the Lightning USB mirroring on Mac OS X which
has no limitations in this area.
2. Robot Machine Configuration
MS Windows Set Up
- Install Java JDK 1.7 from Oracle and put it on the
system path as is described in the Release Notes document.
- Install Robot v3.5 or later.
- Install one of the mirror
applications and activate it. The trial version is
sometimes OK for evaluation purposes. Do not customize the
target install folder to enable automatic mirror starting (since
Robot 4.0.1).
Mac OS X Configuration
- Install Java JDK 1.7 from Oracle.
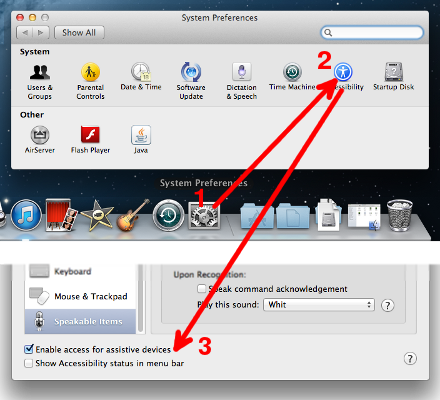
- Enable accessibility - Mac OS X version greater than
10.9.x (Mavericks):
- Click the Apple menu and select System
Preferences. Alternatively click the System
Preferences icon in the dock.
- Click the Security & Privacy icon, and select
the Accessibility icon.
- Unlike previous versions of OS X, which used a universal
checkbox, the new functionality in Mavericks allows users to
individually choose which apps can gain control of the system
to perform their various scripted functions.
If you do not see the "T-PlanRobot.app"
(like in the screenshot below) or the "java"
app (standalone Robot release), please attempt to run T-Plan
Robot at least once, before it appears in this window.
Note: It will be necessary to click the padlock
at the lower left hand corner of the window, to authenticate
as an administrative user, before you can select the check box
next to the "T-PlanRobot.app" item.

- Enable accessibility - Mac OS X version less than
10.9.x (Mavericks):
- Click the Apple menu and select System
Preferences. Alternatively click the System
Preferences icon in the dock.
- Double click the blue Accessibility icon
under the System group.
- Set on the Enable access for assistive devices
check box at the bottom of the window.
- Install Robot v3.5 or later. Make sure to choose the
distribution packaged as Mac OS X application for Oracle
Java 1.7. Alternatively use the standalone cross platform
release.
- Unless you are going to mirror the screen over the Lightning
USB cable install one of the mirror applications and
activate it.
AirServer / Reflector Set Up
While the mirror app is disconnected right click its icon in the
system tray (Windows) or go to the Device menu (Mac OS).
Select Preferences/Settings. Set the options as follows:
- Full screen - OFF (Reflector only)
- Always on top - ON
For Reflector 2 also configure:
- General -> Show Client Name - OFF
- Connection -> Show Frame - NONE
Robot version 4.0.1 will start the mirror app automatically
when the iOS Mirror connection is initiated. For lower versions
connect the Apple device to the mirror app:
- Connect the device to the same network the Robot machine is
connected to (usually over the WiFi).
- Follow the AirServer / Reflector instructions.
Post connection configuration:
- Reflector only: right click the app (Windows) or select the Device
menu (Mac OS). Set off the Show Frame
option to make it display just a plain screen without the
white/black iPhone hard cover image.
- Choose the mirror size (Scale/aspect) carefully and keep it
constant. It is recommended to set the mirror size equal to the
actual device screen one as long as it fits your screen. This
keeps the image blurring caused by the lossy H.264 compression
at a minimum.
Robot Set Up
- Start Robot and verify the following:
- When using a mirror app Robot must be running on the default
Graphite
Look And Feel (LAF) scheme. The standard Oracle
delivered LAFs such as Metal, Nimbus,
CDE,
GTK+
or Windows/Windows
Classic will not work. Other ones supported by Robot
may or may not work. To verify or change the LAF either click
the More... link in
the Login
Dialog or navigate to Edit->Preferences and
select the Appearance & Accessibility
node.
- Open the Help->About dialog and verify
that Robot runs on Java 1.7.
3. iOS Device Configuration
As detailed in the Introduction there are two basic high
level options:
- Non-Jailbroken
(non-rooted) devices can be automated using our T-Plan Plugin or T-Plan Server tool
with the iOS Mirror connection.
Note: The iOS Mirror connection can be applied to any device
supporting the AirPlay Mirroring technology (as per this table).
Mirroring over the Lightning USB cable
is possible only for devices equipped with the Lightning
connector.
- Jailbroken (rooted) devices can be
automated using the Veency (Cydia) VNC
Server connection.
A. Non-Jailbroken Devices
1. Device Configuration
It is recommended to set off the Auto Lock
feature to prevent the device from going to sleep after the
specified idle time:
- Tap the Settings icon in the iOS home screen.
- Go to General -> Auto Lock and
select Never.
The T-Plan
iOS 6 Server enables testing of iOS applications on
iOS version 5 & 6, using the iOS Mirror connection.
- This will give you control over the whole device OS.
The T-Plan
iOS 7&8 Plugin enables testing of iOS
applications on iOS version 7 and higher,
using the iOS Mirror connection.
- This will give you control over the application under test.
- As Apple tightened the security in
iOS version 7, it is not possible to control the touch
screen and keyboard at the OS level any more. The only known
way of automation is to add the automation capability (the T-Plan
library) to the application under test (AUT). This will
allow you to automate the application after it gets started.
- I.e. Currently Robot cannot control the whole iOS, or
any other functionality outside of the application, like
it did using the iOS 6 Server method.
3. Start Mirroring
- If you run Robot 4.0.1 or higher and the iOS application
you are automating contains the T-Plan iOS 7 Plugin v0.7 or
higher you don't need to do anything. Robot will start the
mirroring of the iOS device to the PC screen automatically.
- For Robot 4.0 and/or the plugin v0.6 and lower you must
start mirroring manually on the iOS device.
B. Jailbroken Devices Only
1. VNC Setup (Only for Jailbroken
devices)
- Jailbreak the device.
- Install Veency from Cydia.
- Refer to the Release
Notes document for Veency set up instructions.
2. Start Mirroring
- If you run Robot 4.0.1 or higher and the iOS application
you are automating contains the T-Plan iOS 7 Plugin v0.7 or
higher you don't need to do anything. Robot will start the
mirroring of the iOS device to the PC screen automatically.
- For Robot 4.0 and/or the plugin v0.6 and lower you must
start mirroring manually on the iOS device.
4. Automation
Connection from Robot
- Mirror app only: If you run Robot 4.0 or lower and/or
the iOS application you are automating contains the T-Plan iOS
7&8 Plugin v0.6 or lower please make sure that you have
invoked Airplay Mirroring on the device. Learn more about Airplay Mirroring.
- The device must be connected to the network over the WiFi.
- For iOS 5 & 6, check if the T-Plan Server
is running on the device and start it eventually. When it asks
you for access to the current location approve it. If you
accidentally select "Don't Allow" please enable
it under iOS Settings
->Privacy->Location Services.
- For iOS 7 and higher make sure that the application
with the iOS 7&8 Plugin is running and displayed on the
device screen. The connection will not work if the application
is not running or if it has been pushed to the background.
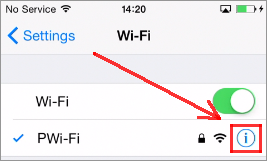
- To find out the device IP address open Settings->WiFi
and tap the little 'i' circle.
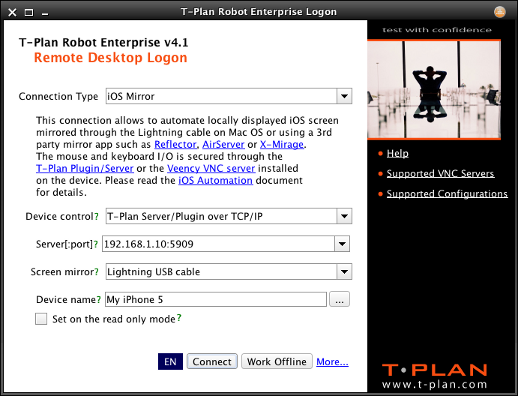
- Start Robot and select the "iOS Mirror"connection type. Then choose
the parameters as follows:
- Device Control defines how the device touch
screen and keyboard will be controlled:
- T-Plan Server/Plugin over TCP/IP will
connect to the T-Plan server component over the WiFi
network. This option requires you to enter the IP address of
the device followed by a colon and the port number of 5909.
See the image below for an example.
- T-Plan Server/Plugin over USB will tunnel
the TCP/IP connection with the T-Plan server through the USB
cable. The device must be connected to a WiFi at least when
the application under test (AUT) gets started to ensure a
correct start up of the network interfaces. This option is
supported only on Mac OS X.
- VNC Server (Veency) will connect to the VNC
server running on the device over the WiFi network. This
option requires you to enter the IP address of the device
followed by a colon and the VNC port number, typically 5901.
- Screen Mirror specifies how the device screen
will be transferred to the PC/Robot:
- Lightning USB Cable will mirror the screen
through the Lightning USB cable connected to Mac OS X. You
must specify the name of the device. There is a selector
allowing you to list devices connected to your Mac.
- Mirror app will use the mirror application
of your choice.
- To connect to a device from a test script use the Connect command (TPR scripts)
or the connect()
method (Java test scripts). The argument URL must be in form of
"apple://<address>:<port>".
For example, let's have an Apple device with the IP of
192.168.100.1:
Example 1: Connect to the
T-Plan
Plugin/Server over TCP/IP using a
mirror app:
TPR test scripts: Connect apple://192.168.100.1:5909
Java test scripts: connect("apple://192.168.100.1:5909");
Example 2: Connect to the
T-Plan Plugin/Server over
USB using a
mirror app:
TPR test scripts: Connect apple://localhost:5909
Java test scripts: connect("apple://localhost:5909");
Connect to the
VNC Server using a
mirror app:
TPR test scripts: Connect apple://192.168.100.1:5901
Java test scripts: connect("apple://192.168.100.1:5901");
Example 4: Connect to the
T-Plan Plugin/Server
over TCP/IP using
Lightning USB:
TPR test scripts: Connect apple://192.168.100.1:5909
device="My iPhone 5"
Java test scripts: connect("apple://192.168.100.1:5909", null,
false, "My iPhone 5");
Example 5: Connect to the
T-Plan Plugin/Server over
USB using
Lightning USB:
TPR test scripts: Connect apple://localhost:5909 device="My iPhone 5"
Java test scripts: connect("apple://localhost:5909", null,
false, "My iPhone 5");
Automation of multiple devices from a
single PC
The preferred way of automation of multiple devices from a single
PC is the Lightning USB connection on
Mac OS X. For other environments the support is limited to
X-Mirage and Robot v4.0.1 or higher. Avoid using the USB tunneling
so that the devices can be identified by the IP address. The
steps:
- X-Mirage only: All mirrors must be up and running prior to the
Robot start.*
- Make sure to have a license with 2+ seats (one seat per each
connection). Insufficient number of seats will make the
exceeding scripts wait for a free connection (sequential
execution).
- To achieve parallel testing execute a schedule with two or
more parallel scripts in the CLI mode. Alternatively start
multiple Robot instances in the GUI mode and initiate the
testing as usual (one instance per one test script).
*If the mirrors are not running Robot will start them (Robot
v4.0.1+ with T-Plan libs v1.0+). This will however make image
comparison unreliable because start of each new mirror will make
X-Mirage resize all other mirrors to fit the PC screen.
Troubleshooting
of mirror apps
- Robot maintains itself as the topmost window with the mirror application
positioned behind its desktop
viewer. If the mirror application is not configured to
stay always on top, Robot may fail to bring it into the desktop
view after the connection. To overcome this click the mirror app
icon in the Windows task bar to push it to the front and then
click the Robot's title bar to lock the application in the
viewer.
- Robot identifies the mirror application in the local OS by the
window title. When the
mirror app is visible but Robot fails to establish the
connection saying "Waiting for AirServer/Reflector to start" go
to Edit->Preferences
in the main UI and select the "iOS Mirror" panel. There's a list
of semicolon separated
java.util.regex.Pattern regular
expressions used to identify the mirror application title.
Update it to match the mirror app window title. On Windows hover
the mouse over the app in the Windows task bar to get the actual
title. An alternative approach for both OSes is to enable the
debug mode in the iOS Mirror panel, make an
attempt to connect and check the log (Help->Log Viewer)
for the list of displayed windows and their titles.
- If Robot fails to display just the device screen and you can
see the application title bar and/or the surrounding frame or
other components in the desktop viewer, go to the "iOS Mirror"
panel and look for the inset preferences. They will allow you to
adjust the view manually.
- Robot is not responsible for the AirServer or Reflector
failures. Should you have any problems with these applications
please contact their support desks.
Image comparison tips
As the iOS device screen is mirrored using H.264 video with a lossy image compression format,
the artifacts (components) on the screen change at the pixel level.
To search for them using Robot template images use the search2 comparison
method with the pass rate of 50% or lower.
Starting with the 4.0.2 the test scripts may force the screen
displayed by a mirror app to a fixed size. This ensures that the
images will match even if the mirroring app changes the window size,
for example as a result of an update. To set the screen size
populate the _DESKTOP_SIZE
variable before or after the connection with the target width and
height as follows:

This functionality is currently supported only for AirServer
and Reflector on MS Windows. Future releases are
planned to deliver support for the Mac OS. The X-Mirage
mirror app is not suitable because it doesn't scale the mirrored
screen on window resizing.
To apply the target size to the current iOS Mirror screen highlight
(select) the variable code line and click the Selection
tool bar button. This will execute the variable command and set the
screen size. See the Execute
Selection for details on code block execution. Future releases
will deliver support of screen size forcing through the GUI tools
such as the Login dialog and the Connect command
property window.
Automation Tips
- The T-Plan iOS 6 Server is marked as a Navigation and VoIP
application in order to be allowed to run in the background. To
avoid draining of the device battery we recommend to keep the
device connected to the power during automation. When the device
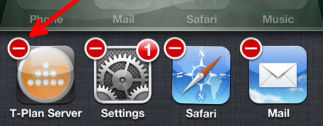
is not being automated the server may be killed as follows:
- Double press the Home button on the iOS
device to open the list of running applications.
- Scroll to the right (swipe to the left) if needed to locate
the T-Plan Server application.
- Long press the application icon until it starts shaking.
Then press the "red minus" icon to kill it. Finally press Home
to go back.
- Avoid running other applications which use the Always
On Top window mode during automation. They can pop
up unexpectedly and interfere with the Robot desktop view.
- Should you need to control the mirror app directly while it is
locked in the Robot view on Windows, minimize the Robot
application to the task bar. Robot will re-lock it after its
window gets restored.
- The landscape mode is supported only when the device is
rotated counterclockwise
(the Home
button on the iPhone is on the right). If the device is rotated
clockwise no error will be reported but the mouse clicks and
drags will not be placed correctly.
- Unlike in some VNC connections, the mouse pointer is not drawn
into the local screen image which Robot works with. You don't
have to make your scripts move the mouse pointer away to perform
image comparison over a certain area.
- As automation is performed on the local desktop, one machine
running Robot can be used to automate only one Apple device at a
time.