T-Plan Robot Enterprise iOS 6 Server
Contents:
1. Overview
2. T-Plan Server Setup
3. T-Plan Server Re-Signing Process
1. Overview
The T-Plan iOS 6 Server enables testing of iOS applications
on iOS version 5 & 6, using the iOS Mirror connection.
- For testing on iOS version 7 & higher use the iOS 7, 8 & 9 Plugin.
- This will give you control over the whole device OS.
From the point of T-Plan Robot Enterprise, iOS 5 & 6 applications with the
T-Plan Server, can be automated the same way as iOS 7 applications with the iOS
Plugin.
2. T-Plan Server Setup
The T-Plan Server is being distributed as an "Ad Hoc" iOS
application (.ipa) signed by the T-Plan certificate. To use the
server within your organization you will have to re-sign it with
your own company certificate, and create a provisioning profile
with the list of devices allowed to run the server. This is a one
time process and the re-signed application, and the profile, may
be then freely distributed to your testers.
The T-Plan Server application and the provisioning profile can be
installed onto the device from a Mac OS X 10.7+ or a MS Windows
machine. An alternative installation of the profile is to mail it to
the device as an email attachment and tap it in the mail client.
Note: If you have already
been sent a "Mobile
Provision (.mobileprovision)" profile file, then
please ignore the T-Plan Server Re-Signing Process above, and
continue with the instructions below.
Installation from Mac OS X
- Connect the device over the USB cable to the Mac.
- Drag the profile (.mobileprovision) and the T-Plan Server app
(.ipa) to the iTunes icon in the dock.
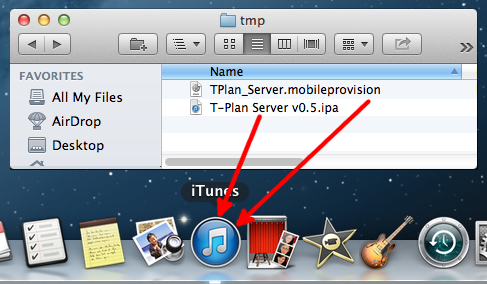
- Open iTunes.
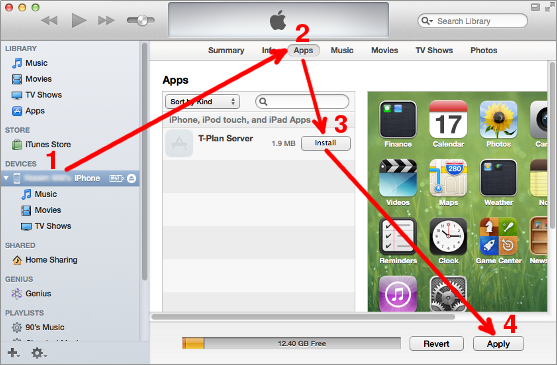
- Select the device under the DEVICES section in
the left tree view and click the Sync button at
the bottom right corner. This will install the profile on the
device. To verify it tap the Settings icon in the
iOS home screen and navigate to General->Profiles.
- To install the server from iTunes:
- Reselect the device under the DEVICES section
in the left tree view.
- Switch to the Apps tab.
- Click the Install button next to the T-Plan
Server application. The label will change to "Will
Install".
- Select Applyto install and start the server
on the device.
Installation From MS Windows
The server and the profile may be installed using iTunes for Windows.
The process is same as the Mac OS one above. The only difference is
that you have to drag the files to the Apps folder
under the LIBRARY section of the left menu.
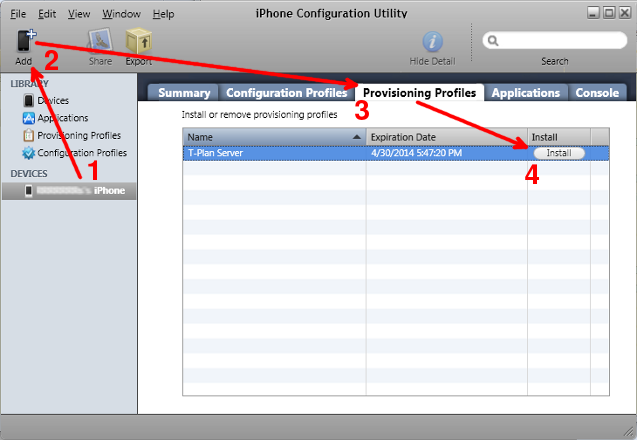
Another option is the iPhone Configuration Utility:
- Select the device under the DEVICES section.
- Click Add on the tool bar. Select the "Mobile
Provision (.mobileprovision)" item in the "Files
of type" drop down at the bottom of the file
selector. Then select the downloaded provisioning profile.
- Switch to the Provisioning Profiles tab.
- Click the Install button next to the profile.
- Install the server app (.ipa) in the similar manner:
- Click Add again. Select the "Mobile
Application (.ipa)" item in the "Files of
type" drop down. Then select the server .ipa file.
- Switch to the Applications tab.
- Click the Install button next to the server
application.
- Tap the T-Plan Server application on the device to start it.
3. T-Plan Server Re-signing Process
Requirements:
- Mac OS X 10.7 (Mountain Lion) or later.
- An Apple Developer Account.
- Xcode installed (v4.x or higher recommended) with the Command
Line Tools package. To install the tools:
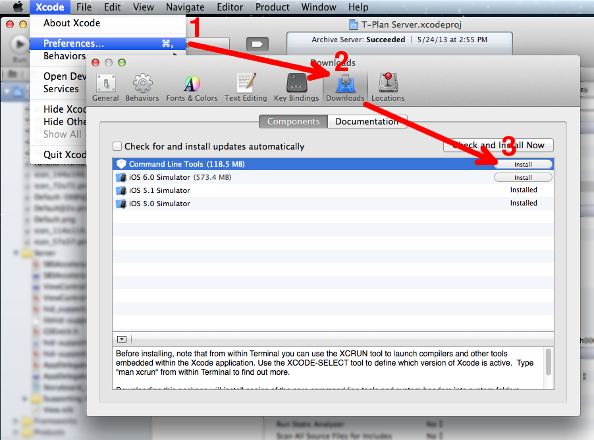
- Start Xcode and select Xcode->Preferences in the menu.
- Switch to the Downloads tab.
- Select Install next to the Command
Line Tools package.
Re-signing Process
Step 1: Register
the test devices
NOTE: This step is
required only if the test iOS device(s) haven't been registered
yet.
- Sign in to the Apple
Developer Center using your Apple ID.
- Select the Devices link under the Member
Center->Certificates, Identifiers & Profiles section
of the Apple Developer Center.
- Register the device(s) that you plan to run
the T-Plan Server on. You will need the device UDID (Unique
Device Identification Number). One of the many ways to get
it is to connect the device over the USB cable to the Mac and
use iTunes:
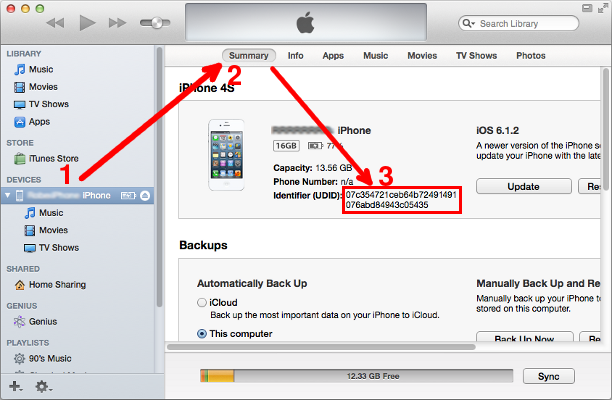
- Start iTunes and select the device under the DEVICES section in the left tree view.
- Switch to the Summary tab.
- Click the Serial Number field. It will change
to Identifier (UDID) and display the UDID.
- Right click the number and select Copy Identifier
(UDID).
- Alternative way to get the number is to install an iOS
application providing the UDID, such as Emonster's
UDID+.
- Once you have the UDID click the "+" button
under the Devices section of the portal and
complete the device registration.
Step 2: Create the
provisioning profile
- Navigate to the Provisioning Profiles section.
- Click the "+" button to create a new profile:
- Select the "Ad Hoc" profile type.
- Select the Xcode iOS Wildcard App ID.
- Select the appropriate distribution certificate.
- Select the devices you wish to allow to run the server on.
You must add at least one device.
- Provide the profile name, for example "T-Plan Server" and select Generate.
- Select Download to download the
"T-Plan
            Server.mobileprovision"
file to your
local file system.
Step 3: Get the certificate
- Go to Member Center->Certificates, Identifiers &
Profiles and select the Certificates link in the iOS Apps group.
- Download the iOS (iPhone) distribution certificate.
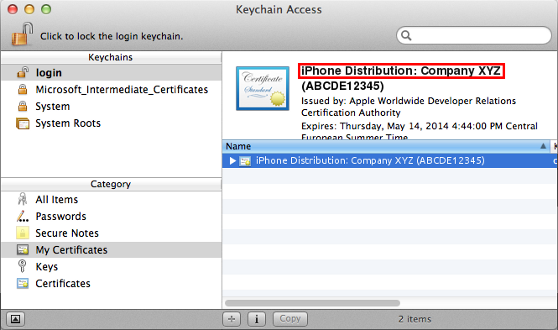
- Open the certificate from Downloads or Finder.
This will import it into your key chain. Then look at the
certificate under the My Certificates screen of
the Keychain Access window and jot down the name.
It should look like "iPhone Distribution: <name>".
Step 4: Re-Sign
the application
NOTE: This step can be alternatively performed using other
applications/scripts allowing to re-sign an .ipa file, such as iResign, AppResigner or the ota-tools.
Another option is to call the codesign utility
manually from the command line (see here).
The script we provide is usually the fastest option.
- Create an empty folder and copy the provisioning profile into
it.
- Download the T-Plan server ZIP file and extract it to the
folder. The download link will be provided by the T-Plan
support. The archive will contain the server application (.ipa)
and the signing script (
resign.sh).
- Open a terminal window (Applications->Utilities->Terminal)
and switch to the folder.
- Execute the
resign.sh script with the
certificate name specified as its argument:
chmod a+x resign.sh; ./resign.sh "iPhone
          Distribution: Company XYZ"
The script will create a new re-signed .ipa file with the "Resigned-" prefix.
TROUBLESHOOTING:
The script reports "no identity found"
- You have provided a wrong certificate name or the certificate
is not installed. Revisit Step 3.
The script reports "object file format unrecognized,
invalid, or unsuitable"
- The server application was compiled against Xcode 4.6.2 while your one is much older. Upgrade Xcode and retry.
- If you already have the latest Xcode and you keep seeing this
message it is possible that there are more Xcode installations
on your computer and the latest one is not set as the active
one. To verify the current setting execute:
xcode-select --print-path
To set the active Xcode installation execute:
xcode-select --switch <path>