Last update: 18 August 2016
Contents:
1. Introduction
2. Setting Up
3. Installing The T-Plan Application
4. Troubleshooting
5. Automation
1. Introduction
T-Plan Robot Enterprise version 4.2 and higher supports automation of iOS 9
devices over Xcode 7 (Mac OS X). Main features:
- All devices featuring the Lightning
USB interface are supported. Simulators are not supported.
- Full iOS control enabled (through the T-Plan Application)
without jailbreak.
- No modification of the tested application is required.
As the connection is slower than the iOS Mirror one it is not
suitable for testing of applications that require real time control,
such as games etc. Use the iOS Mirror
connection instead.
2. Setting Up
- Install Robot on Mac OS X.
- Connect the iOS device through the Lightning USB
cable to the Mac machine.
- Install Xcode 7 on Mac OS X or make sure it's up to date if
already installed.
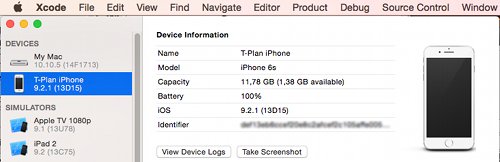
- Start Xcode and select Window -> Devices.
Make sure you see your device in there. This step will enable
the device for development. You will have to repeat it after
every device restart. You may close Xcode after this step. It's
not needed for the connection to succeed.
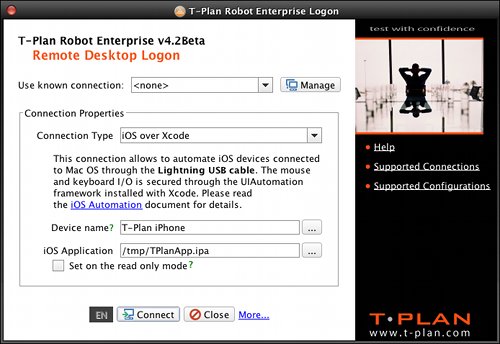
- Start Robot and select the "iOS Over Xcode"
connection. It requires two parameters:
- Device name. To get the name go to Settings
-> General -> About -> Name on your
device. Alternatively click the "..." button to
get the list of connected devices.
- Application path. It must be either an .ipa file (an
Ad-Hoc or Enterprise app) or an .app folder (unzipped .ipa)
stored in the Mac OS X file system.
NOTE: Though the connection requires a locally
stored iOS application it will NOT install the app on your
iOS device. You must install it beforehand. The local copy is used
to verify the application properties and signature. It doesn't
even have to be the same app build (version) as the one installed
on the device.
The connection capabilities are subject to
which application you specify:
- If you enter your own application the connection will run in
the application mode. Your application will be
started on the device automatically and you can automate it.
You will not be able to switch to the Home screen and control
the iOS or other applications.
- To enable the full iOS control mode enter the
TPlanApp.ipa
file. For details on how to install it read the following
chapter. The application will be started and suspended after a
short delay to display the Home screen. You are then free to
automate any iOS component(s) or another app(s).
- Make sure that the iOS device is not locked or in the sleep
mode. Select Connect to establish the connection.
3. Installing The T-Plan Application
The T-Plan application delivers a framework for full iOS control.
As the application must be signed with your certificate chain we
distribute it as an Xcode project. You must compile it under
Xcode, install it onto the target device and create the .ipa file.
This is a one time process which takes about 10 minutes.
Requirements:
- Xcode installed, up to date and configured with a valid Apple
Developer account (matching provisioning profile, valid
certificate chain).
- The iOS device is connected over the Lightning USB cable to
the Mac machine and is accepted by Xcode (listed in Window
-> Devices).
STEP 1: Download
the application project archive. Double click the DMG to mount it.
Open Finder and copy the project from the "TPlanApp"
drive to a folder on your Mac OS X.
STEP 2: Build the app in Xcode and install it on the
device:
- Start Xcode. In the welcome screen click "Open another
project" and select the
TPlanApp.xcodeproj
file from the app folder.
- Set the active scheme to your device name.

- Select the Run button. This will compile the
application, install it on the device and start it. The
application will appear for a short moment and disappear
(suspend). This is expected.

STEP 3: Create the IPA build
- Select Product -> Archive in the Xcode's
main menu.
- The Archives window will pop up. Click the Export...
button.
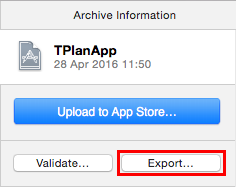
- Select the "Save for Ad-Hoc Deployment" option.
- Use the provisioning and device support defaults. Xcode will
finally save a folder with the
TPlanApp.ipa file
to your desktop.
- Close Xcode. It is not needed any more.
4. Troubleshooting
- Make sure to use the original Lightning USB cable shipped
with your iOS device. Apple is known for making the iOS refuse
cables from other producers.
- Connect the cable directly to the Mac's USB port. Do not use a
USB switch or hub.
- The connection is slow to start because the Xcode framework is
slow. We can't help this.
- It takes 1-2 seconds to apply a mouse (touch screen) or
keyboard event. This is a limitation of the Xcode framework.
5. Automation
To connect to an iOS device from a test script use the Connect command (TPR scripts) or
the connect()
method (Java test scripts). The argument URL must be in form
of "xcode://localhost"
For example, the following command/method call will connect you to
the first detected device:
TPR test scripts:
Connect xcode://localhost device="My


              iPhone" app="/Users/Joe/myapp.ipa"
Java test
scripts: connect("My
iPhone", new
File("/Users/Joe/myapp.ipa"), false, false
Another alternative is to encode the parameters to the connect URL
query. This form is also suitable for the -c/--connect CLI connection. You may copy the URL of any
of your recent connections from the Tools->CLI Wizard
window. Another alternative is to give your connection a name in the
Desktop->Connection
Manager window and then use it instead of the URL.
TPR test scripts: Connect "xcode://localhost?device=My%20iPhone&app=/Users/Joe/myapp.ipa"
System Pop Ups
System pop ups can not by handled and freeze the connection. Avoid
them.
Touch Screen Support
The mouse clicks and drags are mapped onto the touch screen event
taps and swipes. Mouse wheel events are not supported and they are
ignored.
Keyboard Support
Hardware key mappings:
iOS Hardware Key
|
Robot
Script Key (Action)
|
Description
|
HOME
|
Home, Right mouse click
|
Home key. The key is emulated through the T-Plan
Application and it is not available
in the application mode. Double
Home press is not supported.
|
Keys are simulated through the soft keyboard. For this reason the
connection supports only keys that are on the currently displayed
keyboard.
- Some keys may not be available when the device is in the
portrait mode. For example, you can't press the "Hide keyboard"
key on iPhone in the portrait mode because the keyboard contains
it only in the landscape one.
- Keyboard keys are internally identified by names. As there are
keys with localized names (the name is subject to the selected
language) some keys may fail on non-English keyboards. Should
you need a full support of your keyboard please contact the T-Plan support.
- Extra keys from the list displayed on a long key press are not
supported.
- If you have more keyboards and you wish to press a key on
another keyboard you have to press Tab to switch to it first.
- The Emoji keyboard is not supported. The workaround is to
automate using mouse clicks.
Soft keyboard mappings follow. Availability of the keys marked with
a red asterisk may be subject to the device type and screen
orientation.
iOS Keyboard Key
|
Robot
Script Key (Action)
|
Description
|
ENTER, GO
|
Enter (new line)
|
The Enter key.
|
NEXT KEYBOARD
|
Tab
|
The Next Keyboard key switches the keyboard
layout.
|
DELETE
|
Backspace, Delete
|
Backspace key. Deletes characters before the
insertion point. |
HIDE KEYBOARD*
|
Esc
|
Hides the keyboard. |
| RIGHT* |
Right
|
The Arrow Right button goes to the next
character. |
| LEFT* |
Left
|
The Arrow Left button goes to the previous
character. |
| UNDO* |
Ctrl+Z
|
Cancels the typed text.
|
| EMOJI KEYBOARD* |
Ctrl+E
|
Set on the Emoji keyboard. Once switched it must
be operated with mouse (touch screen).
Typing of keys is disabled until the keyboard gets switched
using the mouse back to the key one.
|