T-Plan Robot Enterprise 4.0.2 Script Recorder
Contents
1. Script Recorder Overview
2. General Principles
3. Mouse Event Recording
4. Keyboard Event Recording
1. Script Recorder Overview
Script Recorder is a
component
able to record your interaction with the desktop
into the active editor. It provides what is often called the "Record &
Replay" feature. Since release 3 the feature can record
test
scripts in both the TPR and Java formats.
When the Script Recorder is activated, it attaches to the desktop viewer event queue to capture user
input events such as:
- Mouse events such as mouse moves, clicks
and
drags and mouse wheel events,
- Keyboard events, which represent keys
or
combination of keys pressed on the keyboard.
The events are then processed by the internal scripting command
engine
which produces a piece of scripting code.
To start/stop script recording select/deselect Script -> Record in the main GUI
menu
or
the  button on the tool bar. The
following chapters describe functionality of the recording module
and discuss how to configure and customize its behavior.
button on the tool bar. The
following chapters describe functionality of the recording module
and discuss how to configure and customize its behavior.
2. General Principles
The recorder maps the user performed key and mouse events as well as
their
timeline onto commands of the scripting
language (when the target script is a TPR one) or onto method
calls
of the Java
Test
Script API. The resulting code is always
inserted into current
caret position of the active editor. If there's already a command on
the line, the recorder creates a new line below the current one.
Time spans between single commands are captured through the 'wait'
command
parameters
or Wait
commands where the parameter is not supported. If you for example
perform a
mouse click while the recording feature is on, a command like the
one
below appears in your active editor:
Mouse click to=x:253,y:132
Wait a while and perform another mouse click. The code will look
like
this:
Mouse click
        to=x:253,y:132
          wait=3400

        Mouse
click
to=x:355,y:144
Note that the first command was updated with the 'wait'
parameter. Its value represents the time elapsed between the mouse
clicks in miliseconds. When the preceding command doesn't support
the 'wait'
parameter
(e.g.
Screenshot or Report
commands), the recording module rather produces a Wait
command:
Screenshot init.jpg
        desc="Initial
remote
            desktop state."
Wait
        3400
Mouse
            click
to=x:253,y:132
Preceding WaitFor
commands are never updated this way because their 'wait'
parameters may be related to multiple updates. See the Waitfor Command Window page for
more
information.
To track the time spans the module maintains a timer which measures
time from the last user action (i.e. from the last time it inserted
or
updated a command in the editor). This timer runs only if the
desktop
viewer
is active meaning when the mouse pointer is within its bounds. If
you
move
your mouse pointer out of the viewer, the timer stops and it
won't start ticking until you move the mouse pointer into its bounds
again. This feature allows to exclude the time you spend on other
tasks
such as manual script editing and using of other tools or
applications.
Remember to move
your mouse pointer out of the remote desktop if you are going to do
something else to prevent the module from introducing of large wait
times into the script commands. Otherwise develop a habit of
checking
the generated timeouts and adjust those which are inappropriately
long.
3. Mouse Event Recording
Mouse pointer events are recorded as follows:
- Mouse moves generate
Mouse move
commands
into the active editor. As recording of every tiny mouse move
would
produce a lot of code, mouse move commands are rather created
only
after
you stop the mouse pointer for a certain period of time. This
timeout
is
by default set to 300 miliseconds.
- Mouse clicks insert
Mouse
click commands
into the active editor. Two subsequent clicks are recognized as
double/multiple clicks if their time span does not exceed
configured
delay. Default value is 300 miliseconds.
- Mouse drags produce
Mouse
            drag
commands.
All parameters described above are configurable in the Mouse panel under the Script Recorder group of the Preferences window. See the following
screenshot.
To produce a shorter and simpler
test script code one can disable recording of the mouse move events.
It
is then however necessary to avoid any desktop actions which are
triggered by mouse
moves. A typical example is the Start menu in MS Windows which
displays
submenus depending on mouse moves. Such actions will not record if
mouse
moves are disabled and your script will fail to reproduce the
required
behavior. A workaround is either to perform mouse clicks

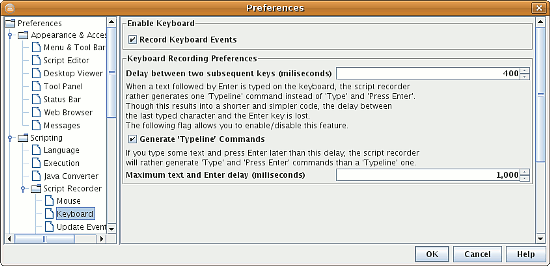
4. Keyboard Event Recording
Keyboard events are recorded as follows:
- If the key you press is an action or control key (e.g. Alt+S,
F1,
Enter, etc.), a
Press
command is produced. If the same key is pressed within a certain
period
of time, it is considered to be a multiple press and the
recorder
produces a
single Press command with the 'count' parameter set
to the
number of pressed keys. This delay is by default set to 400
miliseconds.
- Any other characters will be
concatenated to a text and a
Type
command is
produced. If you type a text and press Enter, a Typeline
command
is created rather than two separate commands 'Type
<text>'
and
'Press Enter' provided that the Enter key is
pressed
within a certain time period after the last text character. This
timeout
is by default set to 1 second.
All parameters described above are configurable in the Keyboard panel under the Script Recorder group of the Preferences window. See the following
screenshot.