This window allows you to
create a
CompareTo script command easily via GUI and insert it into the active
editor.
If the window is opened while the caret is on an already existing
CompareTo command in the editor, the window loads its parameters and
allows to edit the command.
See the Compareto
command specification for more information on fields and values defined
in the window. To open the window either select Script
->
Compareto
Command or click
on the corresponding toolbar button in the mani GUI menu. To edit an
existing command perform a right mouse click on the command in the
editor and select Properties
in the context popup menu.
The major window component, the Template
Properties panel, is a shared component used
in the Waitfor
Command and Screenshot
Command
Windows as well. It provides a common way to define a
list of template images and/or image collections and
configure image comparison
parameters. The panel consists of five components:
The Template
Image
File
List allows to create a list of one or more template
images or image collections (directories with images). The image on the
left shows the list with one image collection called calculator
which contains two images. The 
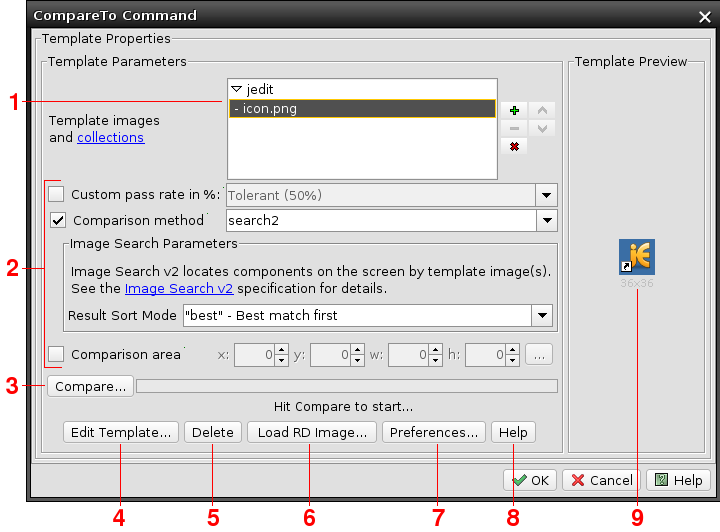
button opens a file browser
allowing to select an existing image file or a collection from the file
system. To create a new template from the current desktop image type a
file name which doesn't exits yet into the browser's File Name field. The button removes the selected
template from the list. The button rewrites the
selected file with the current remote desktop image (this is really
done only after the dialog is closed with the OK button)..
The file browser initially opens in
the template folder defined by the _TEMPLATE_DIR
script
variable. If this variable is not defined, the path
defaults to the value in user preferences (look for the Language preference group). If no
default path is
configured, the template folder finally defaults to the user home
folder.
The arrow buttons and allow to change order of the
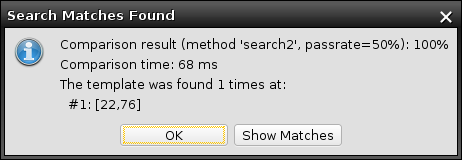
templates. As image comparison is performed against one template at a
time and it stops when a single match is achieved or the end of
template list is reached, the order may play a role in
performance. For best performance place the templates with higher
occurence probability first.
The panel below the file list component
contains image comparison parameters, such as pass rate, comparison method and comparison area. For details refer
to the CompareTo
command specification.
An interesting enhancement delivered in v2.1 are comparison method
specific parameters represented by the Image
Search
Parameters group in the picture. These parameters are
displayed dynamically depending on the selected method and allow to
pass algorithm specific values to the selected image comparison method.
This functionality is currently used just by the image search which
newly supports background color independent comparison. For more
information on particular parameters refer
to the CompareTo
command specification. As these parameters are also supported by the
template editor, additional information can be found also in the Template Image Editor help topic.
The Compare
button allows to execute the image comparison against the currently
selected template (one at a time only) with the
parameters specified in the window. If a custom image has been
loaded
from a file using the Load RD Image
button, the comparison is performed against this image. Otherwise the
currently connected desktop is used.
This feature is useful to verify that the command works as expected. It
may be also used to debug comparison against a desktop image saved to a
file earlier on (this is similar to the Static Image Client
functionality delivered in 2.2). If the "search"
comparison module is specified, there is additional functionality
allowing to debug the comparison to the level of individual pixel
mismatch. See the Image Search Features chapter
later on.
The Edit
Template
button opens the currently selected template in image editor which
allows to crop it. This window can be opened also through a double
click on the thumbnail image in the Template
Preview component. Note that though the image preview component
will display a
cropped image, the Edit Template window will always display the full
size image if reopened and you can edit the crop area as many times as
needed. The
image gets really cropped and saved to a file only when the window is
finished with the OK button.
The Delete
button deletes the
selected template file from the file system. Unlike the other actions
this one is performed immediately and must be used with care.
Button Load
RD
Image
allows you to load an image from a file and perform image comparisons
through the Compare
button against it rather than on the remote desktop image. This
feature is designed to help you to troubleshoot failed image
comparisons which happened in the past, e.g. during automated test
executions. It will have no effect on your script command. To switch
the dialog back to the current remote desktop image click the same
button again (it should read Reset
RD Image when a custom image is loaded) or simply close and
reopen the dialog.
The Preferences
button
serves as a shortcut to the image comparison preferences of the
CompareTo command. These parameters are shared with the WaitFor and
Screenshot commands.
The Help
button next to the
Preferences one displays the Image Comparison Capabilities
section of the language specification.
The Template
Preview component shows a thumbnail image of the selected
template image together with its real dimensions. If the image fits the
component display area, it is not scaled and displays in full size such
as the template on the picture above. Double click on the image opens
the Image Editor (just like the Edit
Template button described above).
2. Image Search Features
When the comparison method is set to one which produces locations, such
as the "search2", "search", "object" and "text" ones, the Compare button offers an extra
functionality. If there is at least one match, the window displays a
message box with a list of coordinates as is displayed below.
Selecting the Show Matches button
opens
a
window with a copy of the remote desktop image (or eventually the
image loaded through the Load RD Image
button). An example follows:
The window provides several important features. The first row of
controls contains a drop down called Match(es)
Displayed containing locations (rectangles) of the template,
objector text instances found on the remote desktop. Selecting a
particular match
will highlight the corresponding rectangle with a red border (unless
the Match Rectangle check box
is off). The color is configurable through the color drop down on the
right for the case the red color conflicts with the desktop color.
The second row of controls deals with pixels
and
pixel
differencies. This functionality is specific for the Image Search
("search") method and it is not used by other ones. When the pass
rate was set to a number lower than 100% the controls display the
mismatching pixels in the selected color (green by default).