Image Comparison With T-Plan Robot Enterprise 2.3.5
Contents
1. Overview
2. Image Comparison Factors
3. Image Comparison Method 'default'
3.1 Algorithm Description
3.2 Usage
4. Image Comparison Method 'search'
4.1 Algorithm Description
4.2 Usage
5. T-Plan Robot Enterprise Image Comparison Support
6. Troubleshooting Image
Comparisons
6.1 Image Search Factors
6.2 Real Life Example
6.3 Debugging Of Failed Image Searches
1. Overview
Unlike object oriented testing tools T-Plan Robot Enterprise works just with the
image of the remote
desktop. That's why image comparison is one of the few means to verify
the contents of the server desktop and behavior of the tested object
(software, application, OS, ...).
Terminology used throughout this document:
- Image
Template is an image saved to a file which is being compared to
the desktop image.
- Image
Comparison Method (Algorithm)
is a standalone plugin which generally accepts two
images on input (typically desktop image and a template image) and
produces a number (usually percentage) indicating
how much the images match.
T-Plan Robot Enterprise 2.3.5 provides two basic image
comparison methods:
- 'default' - Histogram based image
comparison method.
- 'search' - Method
allowing to search
certain remote desktop image area for another image (called template).
As image comparison methods are in facts plugins, users wishing to
implement custom algorithms may take
advantage of the Plugin Framework
as well as the Image
Comparison Java API
to write their own Java code and plug it into T-Plan Robot Enterprise.
2. Image Comparison Factors
As reliability of most image comparison methods decreases with factors
producing image differencies on the pixel level, consider the following
hints:
- Change the remote desktop
background to a solid color to minimize
the number of mismatching pixels. Choose such a color which is not
contained in the application window which you are going to test. As
performance of most comparison methods improves with decreasing number
of colors in the desktop and template images, it will also make your
scripts faster.
- Remove
all icons and items from
the remote server desktop and
make it as simple as possible. Note that most desktops also display a
clock/date which introduce mismatching image areas. If such an object
participates in the area you are comparing to, use the method means
(pass rate, transparent templates) to increase tolerance of mismatching
pixels.
- It is a good practice to use the Mouse move command to move
your mouse pointer to a constant position before comparison.
Mouse
pointer forms part of the remote desktop image and it is a source of
mismatching pixels.
- Do not perform image comparison against
images with lossy
compression such as JPEG. Though the tool will complain
initially, it will finally let you do it (though the comparison will
most likely fail due to too many mismatching pixels). PNG and BMP
formats are
preferred because they
preserve
100% of the image information and guarantee reliable and stable
comparison results. GIF is generally also a good one; be however aware
that it's palette is limited to 256 colors and many tools flatten the
colors when they don't meet the limit. It is recommended to retest
(compare) a GIF template against a desktop image right after it is
created to make sure it works correctly.
- Check if the application window(s) you
are testing have stable
size and open in a stable
location. Variable window size and location significantly
affects comparison results. It is a good idea to maximize the
application window through a scripted key sequence (such as Alt+Space
followed by X on Windows or Alt+F10 on Linux/Gnome) before applying
image comparison.
3. Image Comparison Method 'default'
3.1 Algorithm Description
The default method is based on histogram comparison. An image histogram
is in simple words a list of colors located in the image together with
number of pixels of each color. The method first calculates histograms
both of the remote desktop and template images and compares
them. Result of the image comparison is then calculated as a number of
matching pixels divided by the total number of image pixels.
The following example illustrates how the method works. Let us have two
simple images, image 1 and image 2:
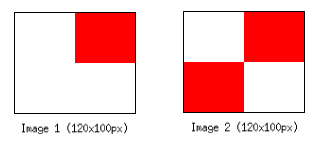
Each image has 120x100=12000 pixels. The following table shows the
histograms and number of matching pixels:
Color
|
Image 1
|
Image 2
|
Matching pixels |
| White |
9000 pixels
|
6000 pixels
|
6000 |
Red
|
3000 pixels
|
6000 pixels
|
3000 |
Sum of matching pixels:
|
9000 |
The comparison result is in this case 9000px/12000px, which is 0.75, or
better 75%. This corresponds to what a human would say when comparing
the images visually - they are different just in one quarter.
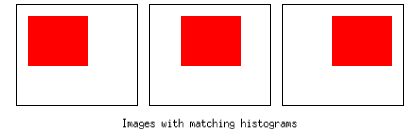
3.2 Usage
The 'default' method was designed for quick
check of the remote desktop against full screen template image(s).
Though it is very simple and has many
limitations, it is quite reliable and there are a few advantages. It is
for
example robust against changes in location of application windows
on
the remote desktop (provided that the background color is solid). The
following example displays three
different images with 100% matching histograms:
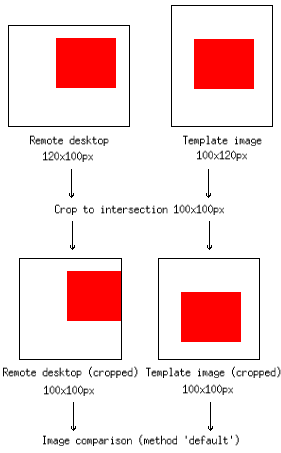
Be aware that the default method is designed to compare two images
of
the same size. If your template image has different size than the
remote desktop, both images are cropped to the size of their
intersection. The following picture illustrates such a
situation:
When a custom comparison area is specified via the cmparea
parameter, the remote desktop image is cropped from the specified [x,y]
coordinates. The values of width and height of the
area are ignored in this case and they are rather derived from the
intersection
size.
It is not recommended to use the default method together with a
custom comparison area because it is easy to make a mistake and compare
rectangles which do not correspond. If you need to check a certain area
of your remote desktop image whether it contains a certain image, use
the 'search' image comparison
method instead.
4. Image Comparison Method 'search'
4.1 Algorithm Description
The search method performs a simple pixel by pixel search of a template
image in the specified remote desktop image area. Though the algorithm
was modified for better performance, it basically runs through
all pixels of the remote desktop image (or its part) and tries to find
match(es) of the template image. The template image must be
smaller than the remote desktop image.
T-Plan Robot Enterprise supports two independent mechanisms of tolerance which may
be freely combined:
- Pixel based tolerance
makes the algorithm search for occurrences which have a
certain amount of pixels different from
the template image. This is achieved through the Pass Rate parameter (passrate) which defines percentage
of pixels required to match. If your template
image size is for example 10x10 (100 pixels) and you specify the pass
rate of 99%, the algorithm will find all areas of remote server desktop
having up to 1
different pixel. Note that the lower pass rate you specify, the lower
the performance will be and the longer the search will take.
- Transparency/translucency
based tolerance allows to ignore certain pixels of the template
image. The image search
algorithm by default counts as "passed" all transparent or translucent
(partially
transparent) pixels having the translucency component Alpha lower than
the limit specified by the Minimum Alpha
parameter (minalpha). For
example, if a
template with 100 pixels contains 90 transparent pixels and the minimum
alpha is set to 0xFF (forcing to search for fully opaque pixels only),
only the
remaining 10 non-transparent
pixels will be compared against the desktop image.
Transparency tolerance may be freely combined with the pixel based one
to achieve positive image search results for a specific application.
For example, if the image from the
previous example is used in a search with 99% pass rate, it will find
all occurencies having up to 1 pixel from the opaque ones different.
Transparency is a powerful method allowing to build image comparison
which is
robust
against background or component color changes. When you for example
search for an
icon rendered on your remote desktop, marking the background color
pixels transparent in the icon template will make sure that the image
comparison passes
regardless of the remote desktop color changes. The template image may
be further on doctored with common image editors to remove
insignificant pixels and leave just a skeleton of the searched object.
This is often the only possible way to test certain types of
applications with unstable object rendering, such as for example
Geographic Information Systems (GIS).
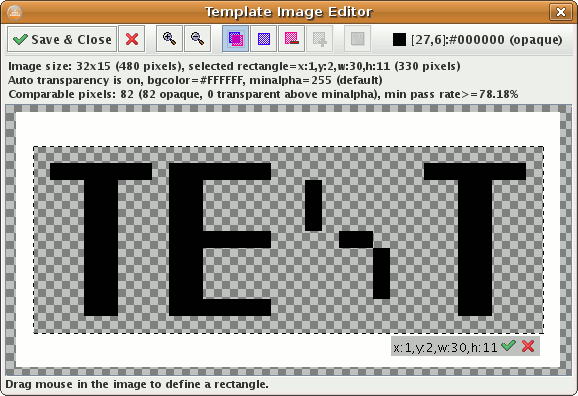
T-Plan Robot Enterprise version 2.1 and higher supports automatic background transparency.
It is a new feature allowing to ignore the template image background
without having to edit the image with a third party editor. The
algorithm accepts an opaque template image on the input (meaning
an
image with no transparency) and applies internaly a transparency filter
which filters out all colors equal to or reasonably similar to the
background. The background color defaults to the first template image
pixel but it may be also specified explicitly through the bgcolor parameter. Automatic
transparency may be comfortably configured through the GUI, in
particular with the Template
Image Editor and the comparison GUI component described in the CompareTo window. An example screenshot with
a template filtered through the automatic transparency feature follows.
Transparency may be also introduced into template images using third
party image editors. For example, Windows and Linux/Unix users may
take
advantage of Gimp to set up transparency as
follows:
- Open the template image with Gimp
- Select Layer->Transparency->Color
To Alpha
- Select the transparent color. It usually works fine if you leave
it on the defaults provided by Gimp (white background color).
- Save the template image to the file.
- Retest with the Template
Image Editor. This is necessary because if the image contains
just
colors which are very close to the background color, Gimp may turn all
pixels transparent or translucent which will make the template unusable
for image search with the default minalpha
value. The Template Image Editor is able to detect such cases and
suggest changes to the image search parameters.
Unlike the 'default' method the 'search' one returns just two result
values, 'found' (presented as a result of 100%) or 'not found' (0%).
Coordinates of the match locations are
then
provided in form of variables which can be accessed during script
execution and further processed. See the CompareTo command
specification for more info on the variable format. Also note that
the number of occurrences is limited by a parameter in the
Compareto command preferences which can be customized in the Preferences window.
It is recommended to save the template images in PNG format through the
CompareTo, Screenshot
of WaitFor
match windows. There
are tools allowing you to crop the desired area of the remote desktop
image and save it as a template. If you use images saved by other
applications, it may happen that T-Plan Robot Enterprise will not be able to match
the
image due to an incompatible pixel format.
4.2 Usage
The method can be widely used to verify that the remote desktop image
contains a desired component or window. It is also possible to search
for a component (such as a button, link or even a text) or an
icon and then click onto its coordinates.
It is recommended to use the method together with a custom
comparison area (parameter cmparea of the scripting
language commands) to narrow the search area. Though you may search the
whole remote desktop, the algorithm is considerably faster with smaller
areas. It is also recommended to keep the template images as small as
possible which also significantly improves method performance.
The following example illustrates a few basic principles of template
selection for use with 'search'. Let's have a web site called T-Plaza
displayed in a Firefox browser on the remote desktop. There's a header
image with HTTP links such as Register,
Films, Cinemas and Book Now.
 Not a good
template.
It is unnecessarily large. In
addition as the image search will return coordinates of the upper left
template corner, clicking on it will
not select the Register
link. You could still use the template but you would have to adjust the
Mouse click command manually by adding a few pixels to the coordinates
(such as for example Mouse click to=x:{_SEARCH_X}+10,y:{_SEARCH_Y}+15
).
Not a good
template.
It is unnecessarily large. In
addition as the image search will return coordinates of the upper left
template corner, clicking on it will
not select the Register
link. You could still use the template but you would have to adjust the
Mouse click command manually by adding a few pixels to the coordinates
(such as for example Mouse click to=x:{_SEARCH_X}+10,y:{_SEARCH_Y}+15
).
Task 1: Verify that the
T-Plaza home page is displayed in the browser.

|
Not a good template.
First of all it is too large
and the search will be slow. Second, the image will most likely appear
in all other T-Plaza web pages
and that's why a positive search result doesn't actually verify that we
are on the home page.
|

|
Better template
provided that the text is unique and appears only on the home page. An
optional step is to make the grey background color transparent to make the template
robust against the background color changes.
|
Task 2: Locate the Register link and click on it.

|
Not a good template.
It is unnecessarily large. In
addition as the image search will return coordinates of the upper left
template corner, clicking on it will
not select the Register
link. You could still use the template but you would have to adjust the
Mouse click command manually by adding a few pixels to the coordinates
(such as for example Mouse click to=x:{_SEARCH_X}+10,y:{_SEARCH_Y}+15
).
|

|
Better template. It
is reasonably small but still uniquely identifies the link. As the
start location (upper left corner) is inside the link, it is possible
to click directly onto the coordinates to select it.
|
5. T-Plan Robot Enterprise Image Comparison Support
Image comparison method plugins are closely integrated with three
commands of the T-Plan Robot Enterprise 2.3.5 scripting language:
- Compareto -
Compare a template image to the remote desktop.
- Screenshot -
Save screenshot of the remote desktop to a file and eventually compare
it to
a template image.
- Waitfor match/mismatch
- Pause the execution until ('match')
or while ('mismatch') the
remote
desktop matches to a template image.
All three commands support almost the same image comparison parameters.
There are CompareTo, Screenshot of WaitFor
match windows allowing to construct and maintain the commands
easily via GUI. See the following picture showing a fragment of code
with these
commands together with the corresponding image comparison GUI component.

It is usually necessary to branch the script behavior based on the
image comparison result. There are two ways to ensure it:
- Use the
onpass and onfail command
parameters ontimeout in case of
the Waitfor
command) to specify what should be done when image comparison succeeds
or fails. A disadvantage is that it is allowed to specify just one
command or procedure name.
- Use the
if statement testing the command exit
code. You may take advantage of code templates provided by the Script Editor. component
The following two examples are equivalent and terminate the script
execution with an exit code 1 when the image comparison fails:
# Example #1 - Exiting through
the 'onfail' parameter
Compareto
test.png
method=search onfail="Exit 1"
# Example #2 - Exiting through an 'if' statement
Compareto
test.png
method=search
if
({_EXIT_CODE} > 0) {
Exit
1
}
Another example demonstrates how to search for a button template image
and then click it:
Compareto button.png
method="search"
# If the button is found, the exit code will be 0
if
({_EXIT_CODE} == 0) {
Mouse
click to=x:{_SEARCH_X},y:{_SEARCH_Y}
}
See the T-Plan Robot Enterprise
2.3.5 Language
Reference document for additional examples and more information on
the scripting language.
6. Troubleshooting Image Comparisons
6.1 Image Search Factors
A number of users experience failing image comparisons with
T-Plan Robot Enterprise,
especially image searches. Vast majority of these issues are not
product fault and they happen due to a number of test environment
factors. Check the already listed general
factors first. For image search also review the following tips:
- Conflicting
mouse pointer. Yes, mouse pointer forms part of the
image, so move it out of the area of interest when you're going to
create template images and before you execute image comparison!
- Watch out for sources of regular changes of the remote desktop,
for example clock and date field on your system task bar or a blinking
cursor. Do they participate in your image? If yes, cut them out or make
their area transparent.
- Some systems and applications tend to highlight buttons and menu
items when mouse pointer is above them. You may then want to
create two templates, one for regular and another one for the
highlighted state and uset them as a template list for all applicable
image searches.
- Change
in the environment or display settings also affect
functionality of image comparison. If you create your templates on a 24
bit color remote desktop and later on restart the VNC server in 8 bit
color depth, it won't work.
- A few cases of unstable behavior of VNC servers
were also
reported. Note that T-Plan Robot Enterprise is primarily tested with TightVNC and
we don't have resources to cover all VNC clones and
operating systems. If your server implementation deviates from expected
behavior, we can't do much about it.
The following two chapters are intended to give you an overview of how
to reveal causes of failing image comparisons. Be sure to give it a try
before you proceed to contacting us.
6.2 Real Life Example
A real life example of a failing image comparison follows. Let's
suppose you are testing a web page displayed in Firefox 2.0.0.7 on
Ubuntu
Linux 6.0.6. Your remote desktop looks like the following one:
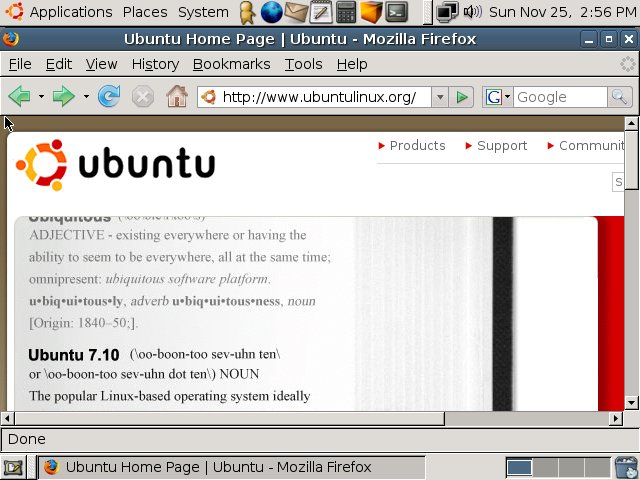
To verify whether Firefox is correctly displayed you decide to cut
a piece of the image with one of the browser buttons and use it as a
template.
This can be easily done through the Compareto window. Let's suppose
that the template will contain the Refresh
button
from the following
area:
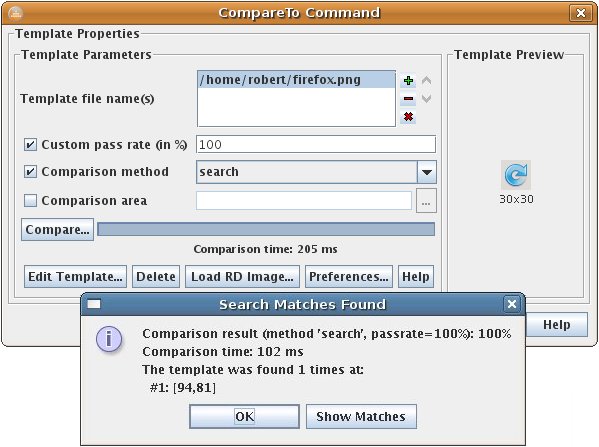
If you set 100% pass rate together with the 'search' image comparison method
and hit the 'Compare...'
button, you get a
nice 100% match:
So far so good. Leave the Compareto Command window with OK. It should
create a Compareto command in your active script editor:

Then go to the
VNC viewer and hover the mouse pointer over the Refresh button. Note that
Firefox will highlight it:

Now move your mouse pointer away from the button so that its original
state is restored. Right click the Compareto
command in the editor and select 'Properties'
in the pop up menu to reopen the 'Compareto
Command' window. If you retry the
image comparison, it fails to find
the button for no
obvious reason. When you cut out the same image again and
compare it
with the old one, they visually appear to be the same:
Old Image
|

|
New Image
|

|
Do you think that there's no difference? Yes, there unfortunately is,
and T-Plan Robot Enterprise
provides powerful tools to debug it.
6.3 Debugging Of Failed Image Searches
T-Plan Robot Enterprise provides an image search debugging mechanism based on the
tolerant search (meaning support of search with pass rate
lower than 100%) and tracking of differences between two images. This
functionality allows the 'Compareto
Command', 'Screenshot Command'
and 'Waitfor Command' windows
to debug
different pixels of a template image and a certain match area of the
remote desktop image (or any other image loaded
through the 'Load RD Image'
button).
To access this functionality you have to achieve a search match first.
If you are doing image comparison through the 'default' method, switch to the 'search' one temporarily. There are
two techniques to achieve a match in failing cases:
- Decrease the pass rate gradually
and verify existence of a match
through the 'Compare...'
button. This approach helps in most of the cases.
- Enter the comparison area equal to (in case
you know it exactly)
or
a bit bigger than the original cut rectangle. This will allow you to
decrease the pass rate to values close to 0% without having thousands
of matches in the whole picture. It also allows the image comparison to
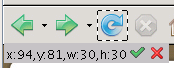
run much faster. In our example the expected match area equals to x:94,y:81,w:30,h:30.
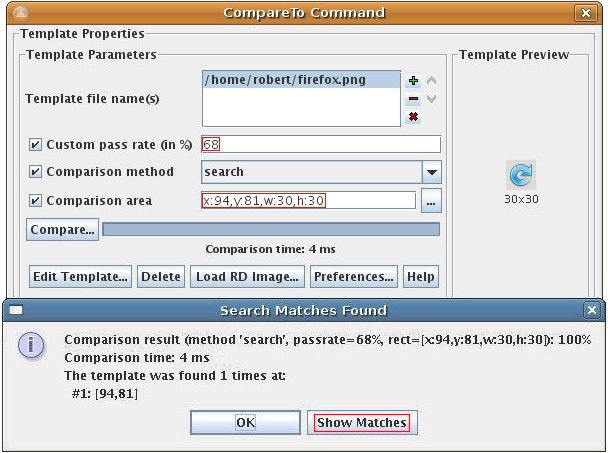
To achieve a match in our Firefox example above one has to decrease the
pass rate to approx. 68%. Review the modified parameters of pass rate
and comparison area highlighted in the following picture:
Once you have a match in the expected area, select the 'Show Matches' button to display
more details. Part of the window is shown on the following picture:

Our template image has 900 pixels (30x30). The window reveals that
there are 281 different pixels meaning that more than 31% of the
template image pixels don't match with the specified area of the remote
desktop image. These pixels are displayed in green. When you place your
mouse pointer above one of them, the label below the drop down in the
top left corner displays the pixel coordinates both in the remote
desktop and template image coordinate systems together with the
corresponding pixel colors. Though the mouse pointer is not captured in
the picture above, you can clearly see that pixel at [100,93] of the
remote desktop corresponds to template pixel [6,12] but they have
different colors.
Note that this is an example of non-standard behavior of an application
(Firefox) rather than T-Plan Robot Enterprise failure. Firefox applies an image
filter
to the button icon in different modes and leaves residual changes in
the image displayed. If you detect such a problem,
you should stop using image comparison for such areas. Though
decreasing of the pass rate to 68% temporarily resolves the failure,
you can't be really sure whether this behavior will be stable. An
appropriate solution in case of Firefox would be to check existence of
an image in a loaded document or to cut a piece of text from the
browser's menu instead.
Should you have problems with image comparison which can't be debugged
the way we described above, contact us through the Contacts page. To
allow us to debug the comparison process send us the T-Plan Robot Enterprise
version
string together with the images which you compare, your template
image and a screenshot of your remote desktop (taken through the Take A Screenshot Window) or at least a
sub-image of the area you are searching.