T-Plan Robot Enterprise 2.3.5 Component Capture
Component Capture allows to cut
image of a component (button, field, text, ...) from the current
desktop image and generate the necessary script code in a simple and
efficient way.
- To activate the Component
Capture mode select the Component
Capture
 button on
the tool bar or the Tools->Component
Capture menu
item. The desktop image freezes and turns gray save for the default
capture area. To cancel the capture mode simply click (deselect)
the button or menu item again.
button on
the tool bar or the Tools->Component
Capture menu
item. The desktop image freezes and turns gray save for the default
capture area. To cancel the capture mode simply click (deselect)
the button or menu item again.
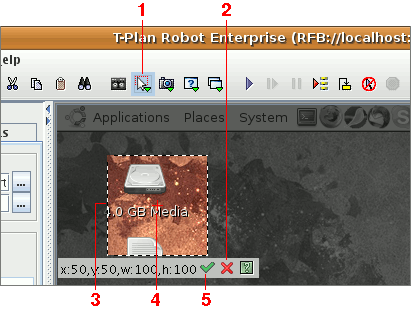
- You may cancel the current capture area through clicking on the
red cross Cancel button. To
recreate the area somewhere else simply drag your mouse in the image
(move mouse while holding the left mouse button).
- To adjust
the capture area drag its corners or
dashed side lines. To move the area perform a mouse drag with either Ctrl, Alt or Shift
pressed. It is recommended to create the component
images as small as possible to improve performance and increase
accuracy.
- The red cross located in the center of
the capture area is called click point.
It can be also dragged and it defines where to click when the component
is found on the screen. The click point may be even dragged out of the
capture area to automate tasks such as "click XY points in this and
this direction from the component".
- Once you are satisfied with the capture
area and the click point location, select the OK button to proceed to
the Component Capture window.
The Component Capture window
defines the target template image file and the task(s) to be
carried out by the script:
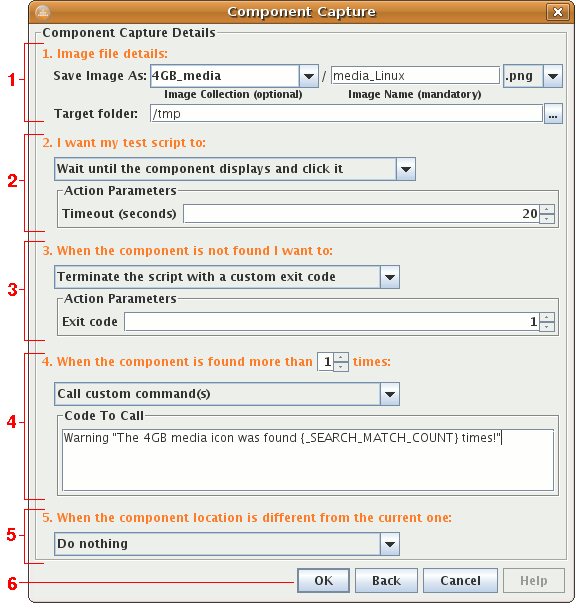
- The first group of controls specifies collection, name and target folder
for the component image file. The Image
Collection field is optional and allows to create a new
subfolder (collection) for the component images. The drop down is
pre-populated with folders available in the target one. When the
collection is
defined, the image comparison will process all images in the specified
directory (or its subdirectories). To read more about collections read
the Image Collections
chapter of the scripting language specification.
The Image Name is mandatory
and defines the image file name without extension. The format and
extension is derived from
the Extensions drop down after the field.
The Target Folder is by
default set to the template directory defined by the
_TEMPLATE_DIR variable in the script. Images and collections residing
under this directory will be called through a relative path.
For example, the parameters displayed in the picture instruct the
window to create a new image collection (subfolder) called 4GB_media under the /tmp template path and save
the component image media_Linux.png
in there. As the image collection is specified, the script will be
configured to search for all images located in 4GB_media.
- Next group defines the task to be carried out with the component.
Simply select an action from the drop down which suits the best your
needs and purpose. Some actions may have additional parameters
which display dynamically below the drop down. For example, the "Wait until the component displays and
click it" action has a configurable timeout.
- The third group specifies what is to be
done when the component is not found
on the screen. Similar to the previous control group there's a drop
down with a predefined set of actions. The action selected in the
picture will make the script finish with an exit code of 1.
- The fourth group defines what to do
when multiple instances of the
component are found on the screen. The list of supported actions
is similar to those available in the previous group. The action
selected in the picture will call a custom Warning command which will
create a warning note in the script report.
- The last group deals with the component location change. As the
original coordinates of the component are saved in the image file meta data, the
script allows to test whether the component has moved and associate it
with an action. The one selected in the picture will ignore any
location changes.
- To close the window, save the component
(template) image and insert the corresponding script code into the
active editor select the OK button.
To go back to the previous desktop view with the capture area click Back.
To cancel the window, discard
any changes and switch off the
Component Capture mode select Cancel.
To open this help topic
select Help.
For example, when closed with OK the window above inserts into the
active editor:
  WaitFor
match  template="4GB_media" method=search
timeout=20s

if ({_EXIT_CODE} > 0) {

  Exit
1


} else if ("{_SEARCH_MATCH_COUNT}" > 1) {

  Warning

"The 4GB media icon was found {_SEARCH_MATCH_COUNT} times!"


} else {

  Mouse
click  to=x:{_COMPARETO_CLICK_X},y:{_COMPARETO_CLICK_Y}

}