Login Window
The Login window provides one of
the three possible ways of connection
to a desktop. A desktop in this sense represents your test environment, connecting to a for example via a
server.
These three mechanisms of connection to a desktop are:
- Manual connection through the Login Window.
- Automatic connection using CLI connect options such as -c/--connect, -p/--password and -u/--user. See the CLI Options Specification.
- Programmatic connection through execution of a Connect command or its corresponding Java Test Script method from an automated testing script.
The window displays when:
- T-Plan Robot Enterprise is started in the default mode without the
-c/--connect the --nologin CLI
options, - T-Plan Robot Enterprise is started with the
-c/--connect and
the
connection either fails or the log in parameters are incomplete, - The Desktop -> Connect Desktop or Desktop -> Reconnect Desktop item
is
selected in
the application GUI menu.
The window consists of the following elements:
-
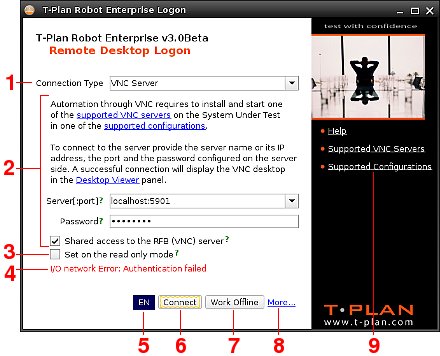 The Connection Type drop
down
allows
to
select
client (protocol) for the desktop connection. For
details about default supported connections and test
environments read the latest Release Notes document.
The Connection Type drop
down
allows
to
select
client (protocol) for the desktop connection. For
details about default supported connections and test
environments read the latest Release Notes document.
- The connection
type
specific
parameters are located in the central part of the
window. These
controls are
created dynamically based on
the client request and they are likely to vary for particular client
selected in the drop down. The are usually fields for desktop server
host name and port (provided that the connection is realized through
TCP/IP),
authentication credentials (user name, password) and other protocol
specific parameters. Follow the link in the client description for
particular client parameter details.
- The Read
only
check box allows to activate the Read-Only desktop mode. It
is a client independent GUI feature which
prevents all local keyboard and mouse events from being sent to the
connected desktop. It should be on when you connect to a desktop which
someone else is already using and you don't want to interfere with it,
for example when you want to view
progress of automated testing in process executed on the desktop by
another process.
This mode can be switched on and off any time through the Read-Only menu item or tool bar button.
- The Error
Field becomes visible on an unsuccessful connection to the
specified test environment and displays the error message.
- The Language
drop
down allows to select the GUI language. As change of
the display language requires restart of the main GUI window, the drop
down is enabled only on the application start up and it is disabled
when the Login Dialog gets invoked from the main GUI window. Though
there is
only English by default, there might be additional language packs
available in the future.
- The Connect
button initiates connection to the desktop using the selected
client and parameters. If the client succeeds, the Login
Window gets disposed and the main GUI window shows up with the desktop viewer component displaying image of
the connected desktop. If the
connection fails, an error message is usually displayed in a new
message box and the Login
Window remains displayed.
- The Cancelbutton cancels the window. On the application start it is titled Work
Offline and it bypasses the desktop connection process and
displays the main GUI window in offline mode (with inactive desktop viewer). It has the same function as the
--nologin CLI option. Connection can be then
initiated later either using the menu items described above or
through execution of a Connect
command from a test script.
- The More...link opens up a menu of more start up actions:
- The Reset
to
factory
settings item renames the
tplanrobot.cfg configuration file in the user home folder to tplanrobot.cfg.bak and restarts the application. This option may help when Robot fails to
start for an invalid configuration value.
- The Change
the
Look
&Feel allows to select one of the 16 available
Look & Feel schemes (skins).
- The Help
section provides links to relevant documents.
(continued from Setting up the Environment)
(continued in GUI Overview)
| 12 December 2014
|
|
Version 1.0
|
 for example via a
VNC
for example via a
VNC